Showing posts with label baking. Show all posts

Saturday, 18 March 2017

Recipe: Creme Egg Scotch Eggs

I've always loved cake.  Well, I say always, there was a month or so around December when I totally went off chocolate and sweet things... but generally, if I end up at a restaurant my eyes will immediately skitter off the starters and mains and straight on to perusing the 'Sweet' menu.

And March in our house is a month of cake.  Both Hubby and I have birthdays that fall in March - actually just six days apart, so we take that as the perfect excuse to stock up on our cake stores!

Normally we buy cake, or make and shake one... this year however we decided to push the boat out.  We had our kitchen totally redone in January, complete with new worktops, cupboards and appliances - so what better way than birthday cake to totally break in the new oven.  So we went all out: a birthday cake each.

Hubby went for a 6 layer rainbow cake for me (excellent work my man!), where as I went for a more seasonal offering for his birthday pudding: Creme Egg Scotch Eggs.
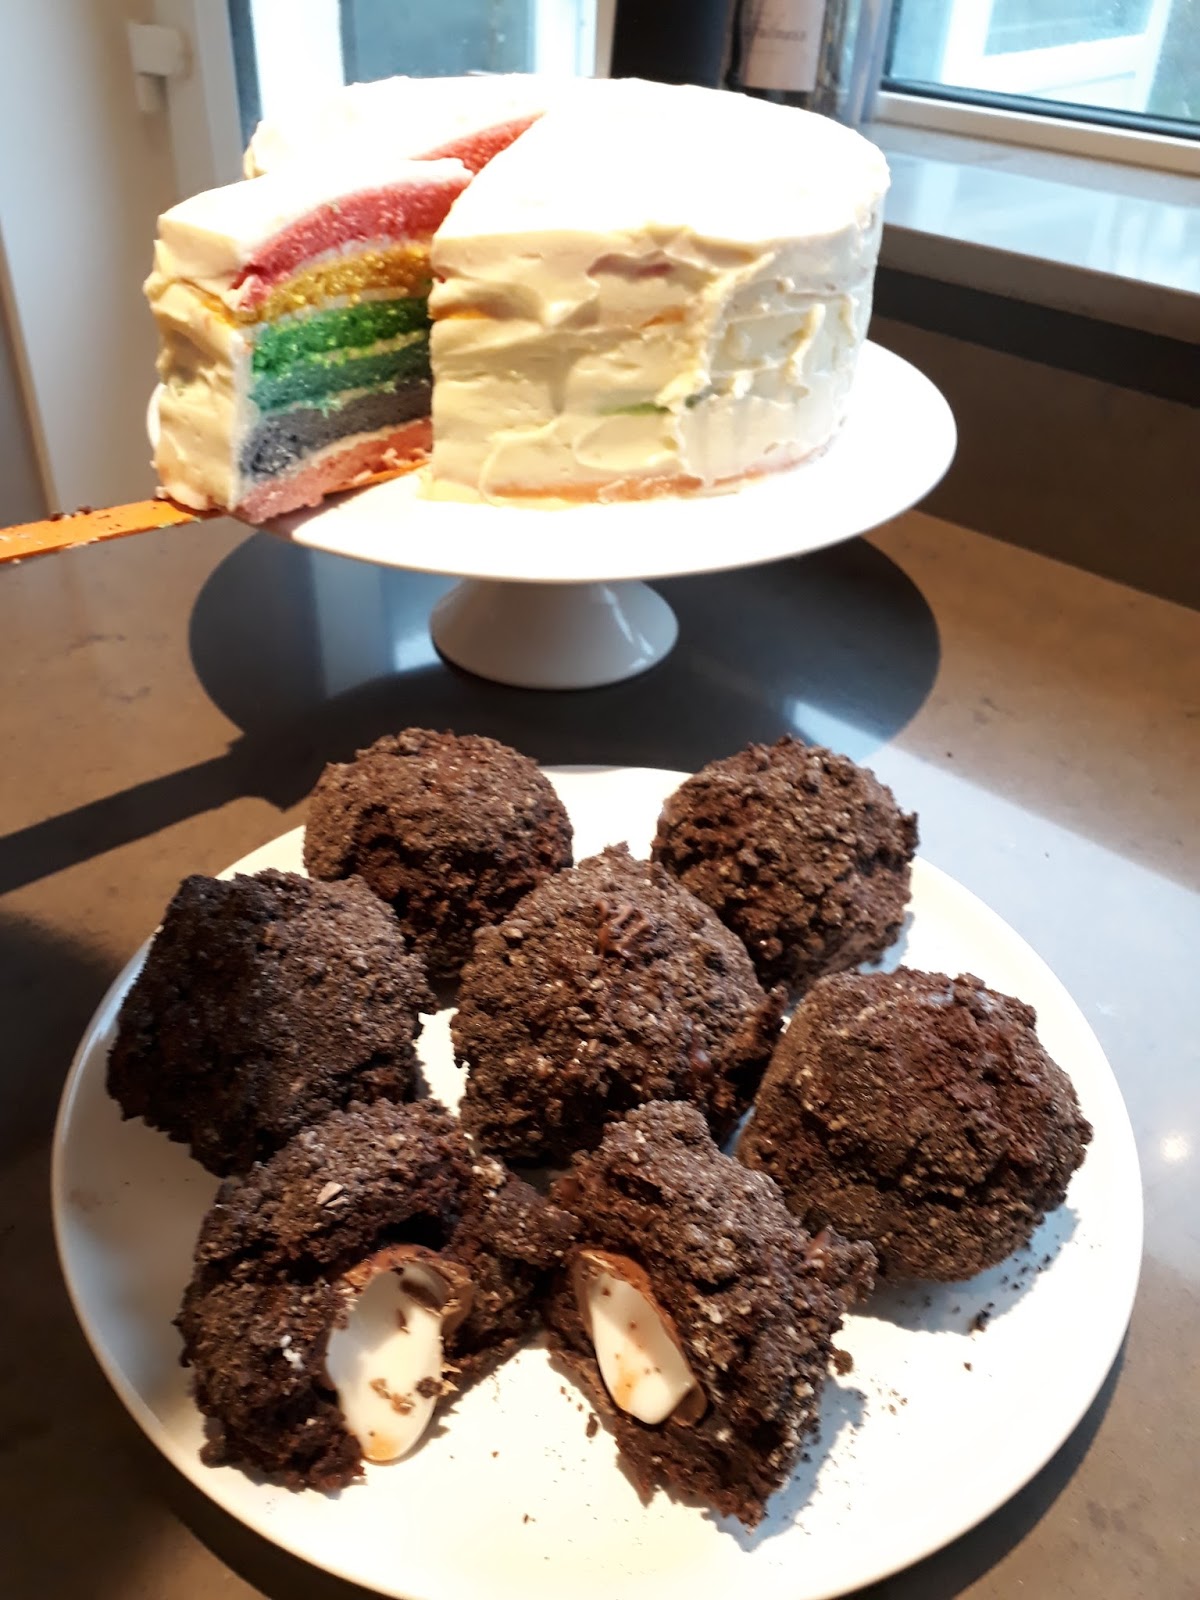


Sorry, shall I say that again?  Creme. Egg.  Scotch. Eggs.

I can not take any credit for these little beauties - I found the recipe posted on OmmNomm's site although I did doctor them a little bit.  What I would say, is that these bad boys should come with a health warning.  


Some tips for consumption:

  1. Eat with a partner - each one of these Scotch Eggs is the equivelent of a sixth of a chocolate cake, fondant, more chocolate, a creme egg and more chocolate (or if you follow my varient Oreo cookies).  Halving one with a loved one is definitely the way to go.
  2. Keep in the fridge - it's odd to me the idea of keeping cake in the fridge, but these go all 'fudgy' if they're kept refrigerated.  So clear enough space!
  3. Don't think about the calories - there will be a lot.  But hey, it's nearly Easter, so if it's just an occasional treat, I'd say settle down and enjoy. 
Here's the recipe I followed (as mentioned, a bit of a tweaked version of the OmmNomm's version - I think it really works!)


Ingredients

  • 6 Creme Eggs
  • 100gm dark chcoloate
  • 100gm milk chocolate
  • 1 packet of oreo cookies - crushed
Cake mix:
  • 175gm unsalted softened butter
  • 175gm caster sugar
  • 4 medium eggs
  • 120g self-raising flour
  • 1tsp baking powder
  • 60g cocoa powder
Fondant
  • 120g softened unsalted butter
  • 120gm icing sugar
  • 20gm cocoa powder

Method

  1. Firstly make the cake - simply cream together the butter and sugar, and then add all of the other ingredients together.  As simple as it comes.  Once the mix is ready pop the cake into a lined tin (doesn't really matter what shape you use as you're going to destroy the cake you make any way!) and bake for 20-30minutes at 160 degrees
  2. Once the cake is firm and a cocktail stick comes out clean, remove from oven and leave to cool.  Whilst the cake is cooling cream together the fondant ingredients.  If you find that these do not come together very well you can use a few drops of water to help this combine (literally a few drops is all you need.
  3. When the cake is completely cool break apart into breadcrumbs.  Yes. Totally.  The whole cake.  Break it into little bits. 
  4. Add the fondant mixture into the cake-breadcrumbs and knead together.  I found it easiest to use my hands for this (and meant that I got to enjoy licking my chocolately fingers clean once I was done - bonus!), until you have a shortcrust pastry-like "dough".  Separate the dough into 6 equal sized balls.
  5. Unwrap the creme eggs and carefully wrap your dough around each of the creme eggs.  I found the best method was to flatten the dough in your hand over your palm, then place a creme egg on your palm and then carefully lift the mixture around the egg.  Once your egg is well wrapped, put the chocolate balls in the fridge to chill and firm up.  This is really important.  Make sure you leave enough time for this step.
  6. Whilst the balls are chilling, melt your chocolate (I cheated and did it in the microwave, but you can do it properly over boiling water if you like) - feel free to put both chocolate types together.  I liked the combination, the bitterness of the dark chocolate prevented oversweetness.
  7. Take your firm balls (oi! mind out of the gutter please!), out of the fridge and carefully dunk each into the melted chocolate mixture so that it is totally coated.  Immediately then transfer the balls to a  bowl of crushed Oreos (the Oreo addition adds a cheesecakeyness to the Scotch Eggs, which I really loved) and coat in the crushed biscuits.  Pop back in the fridge to set.
Once they are cold and the chocolate has set enjoy - but recommend you remember the health warnings listed above.


Wednesday, 16 October 2013

Mojito cake: There's always an excuse for a cocktail!

So you may have gathered that Hubby and I have heen going through a bit of a tough time at the moment.  Thankfully,  and I really do mean lucky-stars thankfully, that seems to be slowly edging behind us...

One of my colleagues put my troubles into perspective - by passionately raising money for charity. Running a half marathon,  selling cocktails desk-to-desk for an added financial boost to sponsorship... it made me sit up and remember the bigger picture.  I've been whining a lot recently, without thinking about what other people might be involved in or going through,  so I decided to surprise my colleagues with something special: cake!


And inspired by my cocktail-peddling colleague I took my flavour inspiration from the mojito!
Who doesn't love a cocktail?!

Mojito Cake

Ingredients

For the cake
25pg butter,
350g caster sugar
4 large eggs
130ml rum
Zest of three limes
350g self raising flour
2tsp baking powder

For the syrup (oh my god, the syrup...)
200ml water
200gm sugar
A good slug of rum
Juice of three limes

For the buttercream
250gm butter
400gm icing sugar
Green food colouring (or if you're feeling creative like me blue and yellow food colouring mixed)
Peppermint essence

For the [pepper]Mint leaves
350gm icing sugar
1 egg white
Food colouring (optional)
Peppermint essence

1) To start with we focus on the cake: cream together the butter and sugar, it's best if you can to have allowed the butter to soften first. Otherwise you're in for a work out if you do things by hand like me. Once light and fluffy gradually add in your eggs. Once combined fold in the flour, lime zest and baking powder.

2) Split the batter into two cake tins and bake in a 170c oven for 30 minutes,  or until cooked all the way through. When the cakes are ready place them on a cooling rack to cool.

3) Whilst the cake is baking it's time to move on to the syrup.  This should really come with a health warning as I really had to stop myself just drinking it... so so good. Make a sugar syrup by dissolving sugar in the water, keep syrup boiling for 5 minutes and then add the lime juice and rum. Leave to cool.

4) Whilst you're waiting for everything to cool  is a great time to start prepping all the decorations. The bit that takes the longest are your peppermint cream leaves (see what I did there) so  I would start here to give them time to harden a little.

5) Mix together all your peppermint cream ingredients until you have a soft dough. You may need to add more sugar - you add a lot of liquid in with the egg white, food colouring and flavouring so you might need to tweak this a little to fet the right consistency.  Cut leaf patterns out from your dough and set to one side to harden whilst you whizz up a quick buttercream.

6) Once everything is cool and your hapy with your decorations you're ready to assemble: carefully prick your sponges and brush or spoon over the syrup. Struggle not to drink it. In traditional sandwich sponge style layer the two cakes with buttercream but then ice the top with some more.  Finally artistically place your leaves.

7) Force yourself to throw away the remaining syrup.

8) Indulge.

Mojito Cake

Friday, 30 August 2013

Recipe: Rum and Raisin Fudge

As some of you may know, a couple of years back and under the guise of 'The Frugal Flat Hunter', I attempted to save the money to move house by cutting out luxuries and scrimping and saving whenever I could.  Well I'm back in a similar situation, but now things have got serious - whilst we no longer live in a flat where the roof leaks, or where condensation runs in sheets off the windows (yes really!) but now, not only are we looking at moving again... this time we're looking to buy.

One of my favourite parts of my money-saving challenge was forcing myself to only use what I had in my cupboards.  It's all far too easy to just pop to the shops and pick up some extra groceries all because you were missing the 2 drops of vanilla essence from a recipe... and seeing as money is going to be tighter than ever, when the baking bug hit recently I decided to make something using only what I already had... the result:

Homemade Rum and Raisin Fudge

It all started when I found a rather ridiculous stash of muscovado sugar at the back of my cupboard - all of which were already open and part used in the way of these things.  Muscovado sugar has a deep flavour, and is great at high temperatures... so I got creative:


Ingredients
  • 900gms Muscovado sugar (I used a mix of dark and light - the molasses flavour ended up quite strong so if you're not a fan I stick more towards the light end)
  • 250gms butter
  • 1 can of evaporated milk (again lurking at the back of my baking cupboard)
  • 200ml water
  • Rum flavouring (3-4 tsp)
  • Handful of rum-soaked raisins - I'd been making my Christmas Cake, so I had some fruits already soaking, but if you don't have any to hand pour a small amount of rum over your raisins and leave to soak overnight.

  1. Using some of your butter grease a Swiss roll tin or similar - I used a a square silicone tray.
  2.  Melt the remaining butter in a large saucepan.  Once melted stir in the evaporated milk, 200ml water, and rum flavouring.
  3. Stir in all the sugar (I found it best to use a whisk to stop the sugar getting too 'clumpy' ) until it has all melted into the buttery liquid.
  4. Now you need simmer vigorously for about 50 minutes, stirring with your whisk every few minutes, to turn it from this:


to this:


Once you're at this stage rapidly cool the mixture by plunging the base of the saucepan into cold water and stir like there is no tomorrow... As you keep stirring and the mixture cools, sprinkle in your raisins. Once the mixture has thickened, become almost grainy in texture and isn't quite so shiny, pour it into the prepared tin and leave to cool completely.

Homemade rum and raisin fudge


Once cool chop into bite-size pieces!

I have to say, this fudge went down a storm in our offices, but it is really really sweet... personally the next time I make it, I think I might top it with some bitter dark chocolate to try to cut through the sweetness... but hey, I think it was a success - not only have our colleagues been treated to some rather scrummy fudge, but that is three boxes of sugar that won't have to make the move with us!

Monday, 26 August 2013

Merry August! My first Christmas cake

It's August Bank Holiday!  And in traditional British bank-holiday style, the blue sky we were promised is no-where to be seen.  Hubby and I have spent the weekend in Kent with some of Hubby's family, and it has been either been pouring with rain, or at best, grey and miserable...

We made our way back around the M25 this morning and, realising that all the shops will be closed due to the bank holiday we decided that an in-house activity was very much on the cards - and for me, when we make the decision to 'do something' in the house, that always means baking!

I had a quick rummage in the cupboards, glanced at the calendar, and formulated a plan...

We'd spent the weekend lazing around with family, so I wanted to make a cake that represented that - and frankly, if the weather wants to turn, at best, autumnal then my baking can be something suitable for chilly day.

Deck the halls with bows of holly... fa la la la la, la la la laaa...

Yes, it may be August, but I have started my Christmas cake!

Currently, the dried fruit is sitting in a bowl of brandy, but once I am satisfied that the little shrivelled things have plumped up enough I'm going to start in the rest of the mix.


Having never made a Christmas cake before I'm really rather excited.  My mum has always been the one to make our family one.  Each year around October she complains that she hasn't started her cake yet, and threatens that this year will be the year that she doesn't bother... but then on Christmas Day, out she comes with a beautifully hand-painted cake.  It's may favourite part of the Christmas meal.

Even if my finished article isn't a patch on what my Mum makes, I figure that 3-months of 'feeding' a fruit-cake will turn it into something beautiful and boozy.

So I better get cracking...  There's only 120 days until Christmas!