Showing posts with label recipe. Show all posts

Saturday, 18 March 2017

Recipe: Creme Egg Scotch Eggs

I've always loved cake.  Well, I say always, there was a month or so around December when I totally went off chocolate and sweet things... but generally, if I end up at a restaurant my eyes will immediately skitter off the starters and mains and straight on to perusing the 'Sweet' menu.

And March in our house is a month of cake.  Both Hubby and I have birthdays that fall in March - actually just six days apart, so we take that as the perfect excuse to stock up on our cake stores!

Normally we buy cake, or make and shake one... this year however we decided to push the boat out.  We had our kitchen totally redone in January, complete with new worktops, cupboards and appliances - so what better way than birthday cake to totally break in the new oven.  So we went all out: a birthday cake each.

Hubby went for a 6 layer rainbow cake for me (excellent work my man!), where as I went for a more seasonal offering for his birthday pudding: Creme Egg Scotch Eggs.
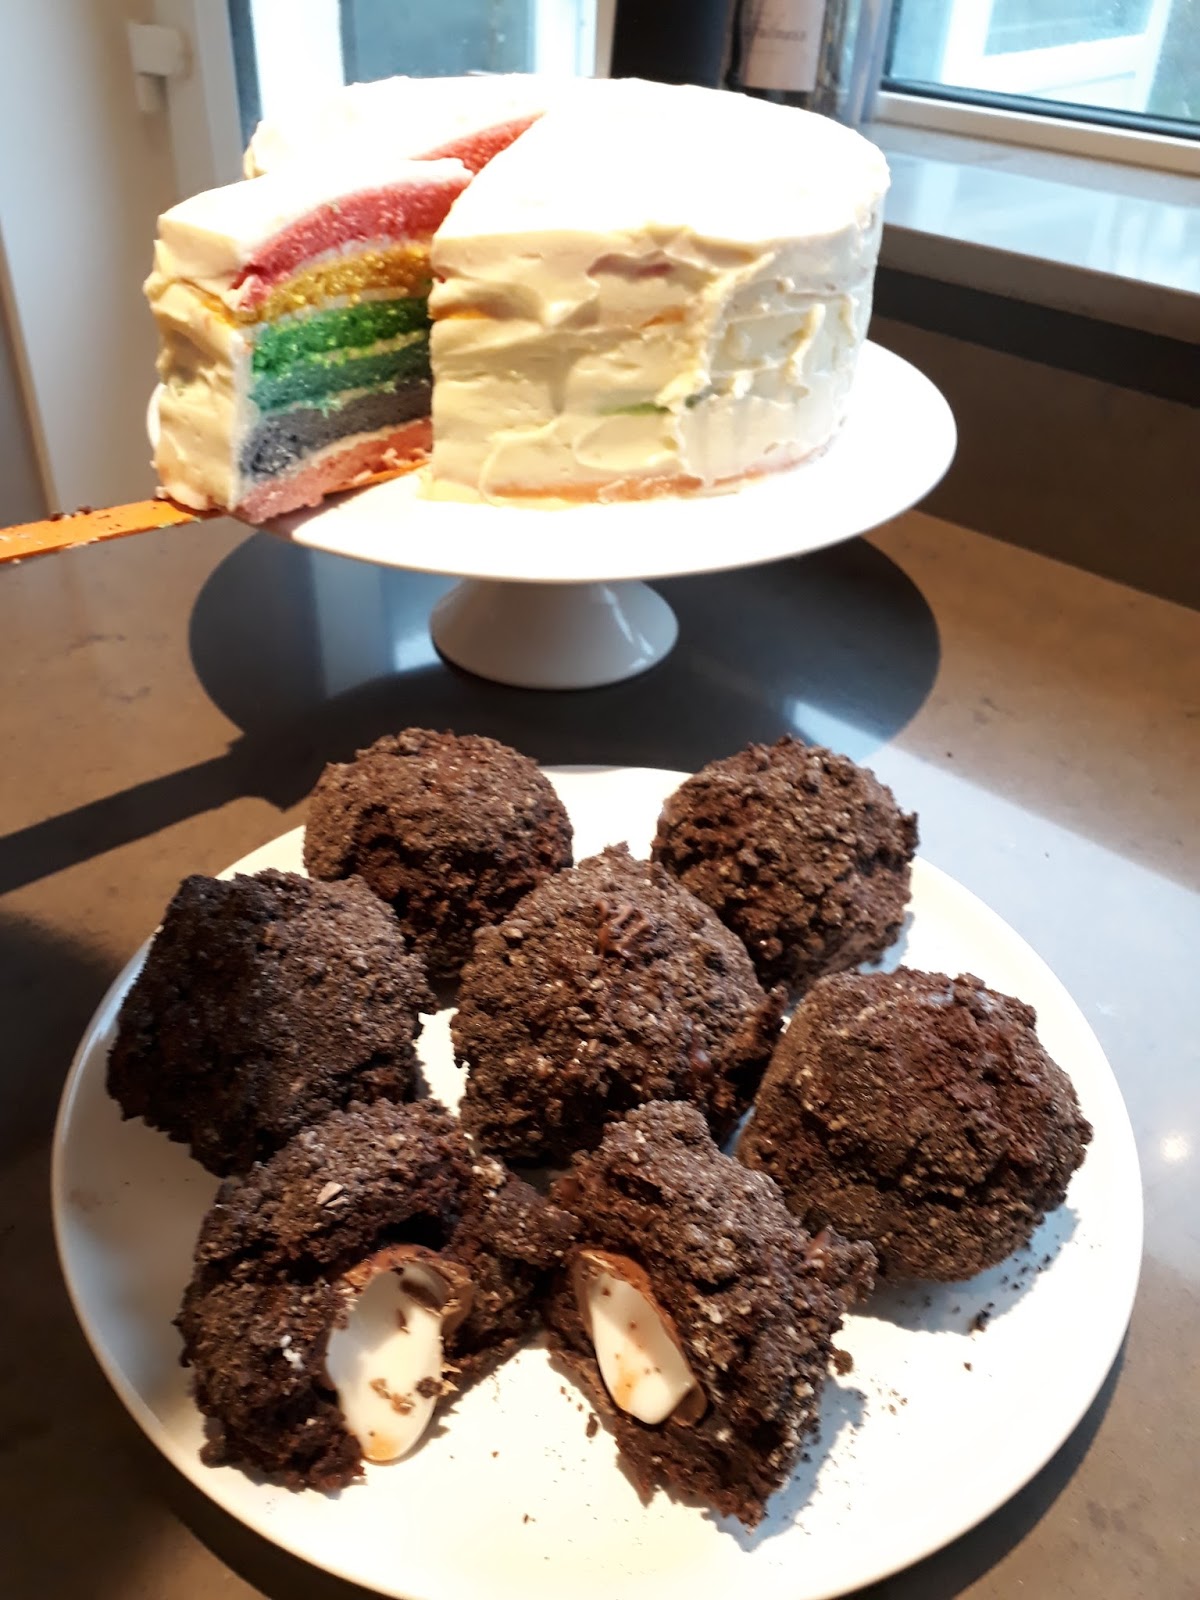


Sorry, shall I say that again?  Creme. Egg.  Scotch. Eggs.

I can not take any credit for these little beauties - I found the recipe posted on OmmNomm's site although I did doctor them a little bit.  What I would say, is that these bad boys should come with a health warning.  


Some tips for consumption:

  1. Eat with a partner - each one of these Scotch Eggs is the equivelent of a sixth of a chocolate cake, fondant, more chocolate, a creme egg and more chocolate (or if you follow my varient Oreo cookies).  Halving one with a loved one is definitely the way to go.
  2. Keep in the fridge - it's odd to me the idea of keeping cake in the fridge, but these go all 'fudgy' if they're kept refrigerated.  So clear enough space!
  3. Don't think about the calories - there will be a lot.  But hey, it's nearly Easter, so if it's just an occasional treat, I'd say settle down and enjoy. 
Here's the recipe I followed (as mentioned, a bit of a tweaked version of the OmmNomm's version - I think it really works!)


Ingredients

  • 6 Creme Eggs
  • 100gm dark chcoloate
  • 100gm milk chocolate
  • 1 packet of oreo cookies - crushed
Cake mix:
  • 175gm unsalted softened butter
  • 175gm caster sugar
  • 4 medium eggs
  • 120g self-raising flour
  • 1tsp baking powder
  • 60g cocoa powder
Fondant
  • 120g softened unsalted butter
  • 120gm icing sugar
  • 20gm cocoa powder

Method

  1. Firstly make the cake - simply cream together the butter and sugar, and then add all of the other ingredients together.  As simple as it comes.  Once the mix is ready pop the cake into a lined tin (doesn't really matter what shape you use as you're going to destroy the cake you make any way!) and bake for 20-30minutes at 160 degrees
  2. Once the cake is firm and a cocktail stick comes out clean, remove from oven and leave to cool.  Whilst the cake is cooling cream together the fondant ingredients.  If you find that these do not come together very well you can use a few drops of water to help this combine (literally a few drops is all you need.
  3. When the cake is completely cool break apart into breadcrumbs.  Yes. Totally.  The whole cake.  Break it into little bits. 
  4. Add the fondant mixture into the cake-breadcrumbs and knead together.  I found it easiest to use my hands for this (and meant that I got to enjoy licking my chocolately fingers clean once I was done - bonus!), until you have a shortcrust pastry-like "dough".  Separate the dough into 6 equal sized balls.
  5. Unwrap the creme eggs and carefully wrap your dough around each of the creme eggs.  I found the best method was to flatten the dough in your hand over your palm, then place a creme egg on your palm and then carefully lift the mixture around the egg.  Once your egg is well wrapped, put the chocolate balls in the fridge to chill and firm up.  This is really important.  Make sure you leave enough time for this step.
  6. Whilst the balls are chilling, melt your chocolate (I cheated and did it in the microwave, but you can do it properly over boiling water if you like) - feel free to put both chocolate types together.  I liked the combination, the bitterness of the dark chocolate prevented oversweetness.
  7. Take your firm balls (oi! mind out of the gutter please!), out of the fridge and carefully dunk each into the melted chocolate mixture so that it is totally coated.  Immediately then transfer the balls to a  bowl of crushed Oreos (the Oreo addition adds a cheesecakeyness to the Scotch Eggs, which I really loved) and coat in the crushed biscuits.  Pop back in the fridge to set.
Once they are cold and the chocolate has set enjoy - but recommend you remember the health warnings listed above.


Thursday, 5 February 2015

Recipe: Slimming World Scotch Eggs

I'll be honest - the title of this blog says it all really.  Scotch Eggs.  That you can eat whilst dieting.  It's like heaven.

My absolute Achilles heel in the whole dieting shenanigans is a buffet.  Sit me in front of some mini sausages, a quiche and a pile of salted peanuts and the idea of counting syns/points/calories just flies out of the window.

Just last week I attended a baby shower, and came face-to-face with temptation, with all these golden treats calling to me.  Being really early in my return to Slimming World, I exercised all the self control I could muster and physically sat as far away from the bite-sized savory snacks and firmly kept tucking into carrot sticks.

Now I'm sure you'll agree that I deserved a treat for all that abstanence, so this weekend I decided to roll-up my sleeves and cook up something Slimming World friendly, that wouldn't look out of place on a buffet table - the result: Slimming World Scotch Eggs.

Ingredients
8 x eggs
8 Sainsburys Be Good To Yourself (Less the 3% fat) Cumberland Sausages - I spent a long time researching this.  These are currently (please check if you read this is a few months as syn-values change all the time) the lowest-syn sausages around  (1 syn per sausage).
2 pieces of wholemeal Nimble torn into crumbs


  1. Hard boil the eggs, plunge into cold water and once cold, peel away the shell.
  2. Take a sausage and squeeze the sausage meat out of the sausage 'skin' - it's a bit like squeezing out meaty toothpaste.
  3. Carefully flatten the sausage meat in the palm of your hand, and wrap around you de-shelled boiled sausage.  This can be tricky.  I found it easiest to wrap the sausage meat around the middle of the egg, and then massage the meat up and down so it covers the whole egg.  Another tip is to make sure your hands are cool and slightly wet, as it stops the sausage from sticking to your fingers.
  4. Carefully roll your sausage-encased egg in the breadcrumbs - be gentle, otherwise the sausage meat could slip off
  5. Place on a baking tray sprayed with FryLight (or similar) and cook in a 200 degree C oven for 10 - 20 minutes, or until the sausage meat has cooked, and the breadcrumbs are golden.
These sausage rolls will be the star of any picnic, or in my case the envy of colleagues when you unearth your packed lunch.  They really won't believe you're on a diet!


Each scotch egg is 2 syns (1 for the sausage, and 1 for the breadcrumbs) - and I don't think you'll find a tastier two syns!


Tuesday, 3 February 2015

Recipe: Quick and Easy Mushroom Risotto

When I was at university, my housemates and I agreed to share the burden of shopping/cooking by collectively eating together each evening.  It was great - generally Hubby (although we weren't married then) and I cooked, and the other two took the challenge of washing up.  It was a good arrangement.  Everyone was happy.

Then there were the occasions, when we would swap roles.

One of my housemates was quite willing to cook... fbut wasn't the most refined of chefs.  Her dish of choice was risotto. But she didn't like the way that risotto rice 'got all wet', and as we were students and we worked our pennies hard, the main feature of a risotto-a-la-housemate was frozen, cheap as they come, sausage.  Lets just say, the memory of gritty uncooked rice and bland meat has meant that the idea of risotto just hasn't ever tempted me...

Except this week.

You see, the thing is, I bought a few too many mushrooms... (even I agree that 4 packs between 2 people is a bit excessive).  So I decided to see what I could whip up that was Slimming World friendly.  The result?  Something so delicious and simple that its made me completely re-think my dislike of risotto.


Ingredients

Mushrooms, mushrooms, mushrooms (seriously, many many mushrooms - I used 300gm of closed cup mushrooms and 200gm chestnut mushrooms)
250gm risotto rice
600ml chicken bovril
1 onion (chopped)
2 cloves of garlic
2 extra light laughing cow triangles
1 tablespoon of fat free fromagefrais


  1. Chop the onion, mushrooms and the garlic and cook in a small amount of the chicken bovril until soft.
  2. Add rice and fry for 1 minute
  3. Add more stock so that is just covers the rice and stir occasionally
  4. Once most of stock has been absorbed, gradually add more.  Reduced and add more stock until all the stock has been included and the liquid has reduced
  5. Whilst hot stir in the two cheese triangles and fromage frais, once melted, add salt and pepper to taste and serve.
(Try not to scoff the lot... because seriously, it's awesome).

Friday, 30 August 2013

Recipe: Rum and Raisin Fudge

As some of you may know, a couple of years back and under the guise of 'The Frugal Flat Hunter', I attempted to save the money to move house by cutting out luxuries and scrimping and saving whenever I could.  Well I'm back in a similar situation, but now things have got serious - whilst we no longer live in a flat where the roof leaks, or where condensation runs in sheets off the windows (yes really!) but now, not only are we looking at moving again... this time we're looking to buy.

One of my favourite parts of my money-saving challenge was forcing myself to only use what I had in my cupboards.  It's all far too easy to just pop to the shops and pick up some extra groceries all because you were missing the 2 drops of vanilla essence from a recipe... and seeing as money is going to be tighter than ever, when the baking bug hit recently I decided to make something using only what I already had... the result:

Homemade Rum and Raisin Fudge

It all started when I found a rather ridiculous stash of muscovado sugar at the back of my cupboard - all of which were already open and part used in the way of these things.  Muscovado sugar has a deep flavour, and is great at high temperatures... so I got creative:


Ingredients
  • 900gms Muscovado sugar (I used a mix of dark and light - the molasses flavour ended up quite strong so if you're not a fan I stick more towards the light end)
  • 250gms butter
  • 1 can of evaporated milk (again lurking at the back of my baking cupboard)
  • 200ml water
  • Rum flavouring (3-4 tsp)
  • Handful of rum-soaked raisins - I'd been making my Christmas Cake, so I had some fruits already soaking, but if you don't have any to hand pour a small amount of rum over your raisins and leave to soak overnight.

  1. Using some of your butter grease a Swiss roll tin or similar - I used a a square silicone tray.
  2.  Melt the remaining butter in a large saucepan.  Once melted stir in the evaporated milk, 200ml water, and rum flavouring.
  3. Stir in all the sugar (I found it best to use a whisk to stop the sugar getting too 'clumpy' ) until it has all melted into the buttery liquid.
  4. Now you need simmer vigorously for about 50 minutes, stirring with your whisk every few minutes, to turn it from this:


to this:


Once you're at this stage rapidly cool the mixture by plunging the base of the saucepan into cold water and stir like there is no tomorrow... As you keep stirring and the mixture cools, sprinkle in your raisins. Once the mixture has thickened, become almost grainy in texture and isn't quite so shiny, pour it into the prepared tin and leave to cool completely.

Homemade rum and raisin fudge


Once cool chop into bite-size pieces!

I have to say, this fudge went down a storm in our offices, but it is really really sweet... personally the next time I make it, I think I might top it with some bitter dark chocolate to try to cut through the sweetness... but hey, I think it was a success - not only have our colleagues been treated to some rather scrummy fudge, but that is three boxes of sugar that won't have to make the move with us!

Sunday, 7 April 2013

Recipe: Butterscotch and Marshmallow Slices

Last week was a big time of change for me.  I changed jobs.  I left the company that I've been with for two years which had become all comfortable like a security blanket, and jumped head first into the situation I'd been craving - one of change, and challenge.

It's all be going well so far, but I find that the first hurdle when you go somewhere new is often to make connections and new friends.  I remember going to residential writing courses when I was a youngster, I loved them, but I'd have to share a dorm-room with up to 4 complete strangers and it was always a bit of pot-luck as to whether you'd get on... I learnt from those early days that the best way to disarm people was to reach out to their stomach.  The whisper of a midnight feast is enough to make any pre-teen grin with delight. I employed a simular tactic when I moved into Halls at university; I propped open my door, and whenever anyone walked past and made eye contact I offered them a gummy sweet... bizarrely that too seemed to work too.

So the time has come to reach out to my new colleagues - and as I feel that this might require more than a bag of Haribo - so I've been busy baking.  On Day Two a box of brownies accompanied me on the commute, and we're dutifully wolfed down by my delighted colleagues, and in fact I've had a number of people comment on them subsequently... so in terms of making an impact I appear to have hit my mark.  But my new office is a lot bigger than my last workplace, so I decided this weekend that one batch of brownies just wouldn't be enough.  And so I've gone for something a little more adventurous.


Creme Egg Brownies
I needed something good enough to follow these fellas...


I've always tend to make something with chocolate, so I wanted a sweet alternative, and this Butterscotch and Marshmallow slice recipe, inspired from one from the Hummingbird Bakery seemed to tick the box...:

Butterscotch and Marshmallow Slices

You will need:

For the base
150g flour
40g icing sugar
120g unsalted butter, softened
10ml milk (depending how well your pastry combines you may not need this this)

For the topping
100g pink and white mini marshmallows
210g caster sugar
150g brown sugar (I used a mix of dark and light as that's what I had in the cupboard)
210g golden syrup
80g unsalted butter
60ml double cream
1 teaspoon vanilla essence
60g crunchy peanut butter
Pecan nuts (enough for sprinkling) - roughly chopped

Marshmallows and pastry
  • Preheat the oven to 170C; grease and line a 22cm x 31cm baking tray.
  • Mix the ingredients for the base until a dough forms.  Hubby and I struggled here a little bit, so we added in a very small splash of milk to encourage the pastry dough to bind together.  However this did make a very sticky dough, and so we had to roll it rather than press it into the baking tray.
  • When you add the pasty to the baking tray make sure that there is a slight lip around the edge (this is to stop all the liquid topping oozing everywhere later) and bake for 20 minutes or until the edges are a light golden brown and the middle is pale but cooked.   Keep a close watch, as the base is very thin and can burn really easily.
  • Once the base has cooked remove from the oven, and scatter the marshmallows on top - as the base is still warm they'll start to melt almost immediately so make sure you spread them out evenly. 
  • Place both types of sugar with the golden syrup and 240ml of water and bring to the boil.
  • Keep boiling for between 5-10 minutes, or until a small drop of sugar syrup forms a soft "ball" in when dropped in cold water. 
  • Remove from the heat and stir in the butter. 
  • Bring the butterscotch back up to the boil and allow to bubble away for approximately 3 minutes.
  • Take the pan off the heat and stir in the double cream, vanilla essence and peanut butter.  Stir continuously until the peanut butter has melted.
  • Pour the mixture on to the base and sprinkle the chopped nuts on top. 
  • Allow to set at room temperature for a few hours or preferable overnight. To be honest, this is the hardest part of the whole bake... because it just looks and smells divine!
  • Slice into bars and serve. 
Butterscotch and marshmallow slices

Oh my, are these bad boys good?! They're sweet and salty, crunchy and chewy... Fingers crossed my new colleagues give it their seal of approval (and that I just don't scoff them all before tomorrow morning!).

Tuesday, 15 January 2013

Recipe: Herman Starter Dough

My office love to bake.  But in December, knowing that post-Christmas we'd all have mountains of leftover food, cakes and chocolate, we agreed that January would be a cake-free month.  Our office wasn't to be used for the family leftovers. We'd leave them at home, and the cupboard in the centre of the office that's normally over-flowing with unhealthy treats would be instead filled with fruit.

That didn't last long...

The thing is, we heard about Herman.

One of our colleagues told us that at her last job her boss turned up one morning and left a strange yeasty smelling pot on her desk... (no puns please).  It turned out that the goo was dough and that her boss wanted her to make a cake out of it.  It sounded such a strange thing to do, to pass on cake-mix friendship-letter like, but at the same time it sparked our imagination... And so a date was set for the Inter-Office-Herman-Challenge.

Essentially Herman is a starter dough which can be included in lots of recipes - it's yeast based, so it "grows" if you look after it properly, which means you should end up with enough mix to make cake for yourself and to also pass on some to friends who can either get baking, or to grow more Herman.

I agreed to get the chain started.  I'm currently on day five of 10, carefully nurturing Herman so that he matures enough to split up and dish out to my colleagues.  So far, so good.  I've not killed him (he stops bubbling when he dies poor thing)- in fact, he's been growing so fast that I've had to invest in another mixing bowl to contain is girth!

I don't know what Herman will eventually turn into - that's up to my individual colleagues to decide, but if you'd like to start your own Herman this is what you will need:


1 packet of active dried yeast
2 tbsp lukewarm water
240ml warm milk
150gm plain flour
225gm caster sugar.


  1. Dissolve yeast in water for 10 minutes and stir.
  2. Place flour, sugar and yeast into a large bowl and mix well.
  3. Slowly add milk and stir until combined - you'll be left with a strange thin custard-like mix.  Cover this with a clean teatowel and leave somewhere warm - it doesn't need to be anywhere too special, the dining room table works, or the kitchen side.
  4. For the next 3 days stir well once a day.
  5. On the forth day, add one cup each of flour, caster sugar and milk and cover again.
I am currently on day 5, and I think Herman really enjoyed the meal I gave him yesterday as when I went to stir again today he looked like this:


The best bubble-reaction so far!  A little bit like AngelDelight I thought, but it certainly won't get mistaken for a pudding... by now the yeast is having a real feast and it smells really strongly!  If you visit your Herman for his daily stir and his surface isn't covered with bubbles its an indication that your yeast has died and that you need to start all over again from scratch.

Assuming that your yeast remains fine and dandy keep stirring once a day until day 9, when you again add 1 cup each of flour, caster sugar and milk, and then on day 10 you can finally split the mix into four and give away a section to three friends for them to either grow their own Herman from, or to bake with.

It's really strange how attached I've got to this strange bowl of goo sitting on my worktop over the past few days.  But I really feel like I'm caring for it, feeding it when it's hungry and offering it a new home when it out grows its current one...  In a way I am not sure how I feel about splitting up Herman and chucking him in the oven.  I'm sure I'll get over it though.  I'm already on the hunt for a good Chelsea Bun recipe.  I can't think of a better way to treat Herman, than to transform him into a bun!


Have you tried Herman before?  What did you make?


Thursday, 20 December 2012

Why We Painted an Apron

This year Hubby and I decided that we needed to be frugal for Christmas.  Initially it was because we thought we'd be starting a family, and then because we thought we'd be moving.  Now it's because we want to be able to do both of those things in the future... and let's be honest, money is tight.

This autumn I went a bit mad for making jam.  Hubby and I spent most weekends arms deep in brambles harvesting berries, so we thought it would be a lovely token to give our homemade conserve... but for our nearest and dearest a little pot just didn't seem "big" enough.  So we got creative, and made something extra to make the gift of jam, just a bit more "gifty."

Christmas presents this year aren't expensive.  But they are brimming with love, time, care and attension.  We're giving a little gift basket of jam and a personalized apron. 

Hand-painted apron


To make your own apron you will need:
  • Cotton Apron
  • Paintbrush
  • DYLON fabric paint or pens
  • Iron

Luckily for me Hubby is a dab hand at art (you may have gathered that fine detail isn't a strong point of mine), so whilst he set to work creating some bespoke patterns based on our relative's initials and things that are important to them, I hit the internet and found some wholesale aprons for less than £4 each.

 1.  Iron the apron to remove the wrinkles.  You'll want it to be as flat as possible for painting


 2.  Once you've settled on your pattern, carefully sketch it on with a soft pencil - you can skip this step if you're confident, but Hubby likes being precise.

 3.  Simply paint in your pattern using the fabric paints.  They work just like normal paints, but be careful not to have too much water on your brush or the paints will run down the fabric (yep, we learned the hard way...).  Don't worry about the paint going hard, or that you can still see the pencil marks, all will be alright in the end.
4.  When you're happy with your creation leave it to dry.

5.  Iron your painted apron again with a very hot iron.  Make sure you put a piece of cotton, or tea towel in between the iron and your painting otherwise you'll end up in a bit of a mess.

6.  Once ironed your masterpiece is fixed in place.  Pop in the washing machine to remove the pencil marks and to soften any hard paint, and you're done!

This is one we did for my Sister-In-Law who's a tech-whiz... and likes roses.  Hubby's a clever stick.


Saturday, 15 December 2012

Recipe: Three Ingredient BBQ Pulled Pork

I love the idea of entertaining, but when it comes to it my cooking skills usually let me down. I bake, but cooking... No... Just no.

But last week the phrase "come over, and I'll cook" just tumbled out before I could stop it. What on earth could a non-chef serve up to 4 girl-friends after a ling day at work?

That's where fool proof BBQ Pulled Pork comes in. It's only got three ingredients. Even I struggled to go wrong!


Three Ingredient BBQ Pulled Pork


Ingredients
  • Pork shoulder/ribs
  • Coke (I used diet cherry coke, but "full fat" makes it stickier!)
  • BBQ Sauce
1) Put the pork in slow cooker. No need to brown it or anything. Just pop it in. Turn the slow cooker to low.

2) Pour over the coke until the pork is almost covered and squeeze in about 300gms of BBQ sauce.

3) Leave for at least 6 hours...

It's done! Said it was easy didn't I?!

Simply pour out the excess liquid and remove the bones (the meat should have fallen off them so they will be easy to pick out) and "pull" the meat apart with a fork.

Serve in big buns with coleslaw and more BBQ sauce and get ready to lick your fingers! Delish!


Wednesday, 10 October 2012

Recipe: Blackberry and Apple Jam

I was lucky enough to grow up in a semi-rural village in Somerset. Not a pretty village I hasten to add, but still one surrounded by orchards.  My grandfather would pay me a one pound to pick the fallen apples off his lawn each weekend and my Nan would whip up a plethora of comforting apple filled puddings for Sunday lunch "afters."

My parents didn't have any fruit trees in their garden, but our driveway was in the shadow of a large, apparently fruitless, tree. After seeing no sign of blossoms or fruit for over a decade, the tree surprised us all one year by sprouting a bumper crop of cherry plums (clearly making up for lost time). The plums were lovely and sweet, but soon our drive was covered in their slippery skins as they slowly rotted... So to combat the tsunami of fallen fruit my mum decided to make jam.
What followed was our kitchen being full of empty sugar packets and saucepans bubbling for weeks. My mother slaved away. And yet not a single batch of jam set. All the plums simply become oversweetened slop.

This year I decided that jam-making inability couldn't possibly be inherited... So I grabbed my gardening gloves, and dragged hubby off blackberry picking.

It turns out that jam is very easy to make if you're sensible. Silly Mum.

Blackberry and Apple Jam
1kg of blackberries
750g green apples (cooking, about 6 peeled & cored)
1.5kg caster sugar
125ml water
1 to 2 teaspoons of cinnamon
1/2 to 1 teaspoon of nutmeg

1. Carefully wash all your blackberries to remove any dirt or bugs that might be hiding in them. We found a few tiny worms so check them carefully!
2. Chop up the apples into small chunks. The smaller the better as they'll cook-through faster, but if they are uneven in size the jam will have a more varied texture.
3. Cook the apples in the largest saucepan you have with the water until they ate sift. Add seasoning and berries.
4. Stir carefully until all fruit is combined and berries start to break down.  Gradually add sugar.
5. As the sugar heats up the mixture will start to spit - be careful. Hot sugar hurts! Do not cover but stir regularly until jam is ready. Test by dipping a tea spoon partly into the mix. Blow on the spoon to cool it. If a skin forms then the jam is ready, if not keep cooking!
6. Carefully ladle jam into sterilized jars and seal.

Friday, 7 September 2012

Recipe: Jam Tarts

When I was a student, and was feeling the pinch I would make my family biscuits for the festive season.  I'd sew little bags, and stuff them with home-made goodies, and they went down a storm.  So I thought this year I'd re-visit my homemade Christmas:  This year, I'm making jam.

Last Sunday Hubby and I hit the blackberry bushes and picked like wild things, chopped up a bag of apples, doshed in the sugar and, having never made jam before, set back to watch the magic.

Unfortunately, it was at the point that we had the mixture on the boil that we realised a some-what crucial flaw in our plan: No jam jars...

Hubby hit the shops just before they closed, managing to grab 6 jars of cheap and cheerful jam.  Back home we emptied out the jars, washed and cleaned them, re-filled them with our homemade jam and stuck them under the bed until Christmas.

But then we had another problem, we were stuck with six-jars worth of Tesco Value jam without a home...  Our solution?  More baking!


Jam Tarts

Jam tarts are delicious and so easy to make.

Makes 12-15


225g plain flour,
25g icing sugar(you don’t need much sugar as the jam is sweet)
150g unsalted butter, softened
¼ tsp salt, or use salted butter
1 egg yolk
25ml cold water
 
  1. Rub together flour, icing sugar, butter and salt in a bowl until combined.
  2. Add egg yolk and water, and mix/knead until you have smooth, soft dough.
  3. I always find pastry works best if you can chill it for a while, so I wrap it in cling-film and pop into the fridge for 20-30 minutes.  It makes rolling so much easier!
  4. Roll out your pastry and using a cookie cutter cut out enough cases to fill a tart-tray and blind bake at a low temperature (160C/ gas mark 3) for 15-20 minutes until the base starts to colour.
  5. Fill with your choice of jam/curd and enjoy!

If you end up with the amount of jam that I had, whilst the pastry is chillin’ in the fridge you can start making another batch of dough…  In the end we ended up with quite production line, and ultimately and awful lot of tarts!  I was popular at work the next day!


Thursday, 23 August 2012

Recipe: No bake Ferrero Rocher

You know those evenings/mornings/afternoons/days/nights where you simply just can't focus on anything?  When your mind has latched it's thought-claws in and isn't letting go? I was crippled with that affliction a couple of days ago... The cause: chocolate.

I don't know if it's just me, or whether my chocolate cravings carefully time themselves for just after the shops have closed, just to remain taunting. But this time I decided I would fight back...

Quick and easy Ferrero Rocher

No baking required!
Makes 15 approx

5 crispbreads (Ryvita works, or if you ever did Slimming World and have a half packet if scan bran lurking in you cupboard, this is a great way if using them without that MDF texture)
3 tablespoons of Nutella
2 tablespoons of golden syrup.

This recipe is an old Slimming World favourite of mine (1-2 syns per ball if you use the crispbreads as a B box), but also fantastic for when you need that quick chocolate hit.
  1. Break up crispbreads, and blitz in a food processor until finely chopped and powdery. Put into a bowl with a splash of water.
  2. Add Nutella (or other chocolate spread) and golden syrup into the bowl and mix until all combined.
  3. Ferrero Rocher fans will know that the little mouthfuls of chocolate and hazelnut delight aren't quite complete without a little paper casing, so position some small cupcake cases on a large plate.
  4. Carefully make the mixture into rough balls (you can use teaspoons, or your fingers!), and pop each ball into a papercase.
  5. Put in fridge for an hour and enjoy almost guilt-free!

(These guys don't look like much, but they are seriously good!)


Tuesday, 14 August 2012

Recipe: Chocolate Cookies and Cream Cheesecake Cupcakes

I came back to work today after taking some time off after last week's turmoil.  My colleagues have been great, although the majority of them don't know why I was off.  Regardless, I wanted to bring something into the office as a private"thank you" to the team.

And what is a better way to show your appreciation than with cake.  And possibly with chocolate.  Oh, and cream...  Okay, so I went a bit crazy.

Chocolate Cookies and Cream Cheesecake Cupcakes

Ingredients 

Makes 15 approx

For the cheesecake-topping-goodness:
450gm soft cream cheese
100gm caster sugar
2 eggs (whisked)
1 tsp vanilla essence
150ml sour cream
12 mini chocolate bars (yes you can eat the rest of the packet...)

For the base:
20 Oreos
30gm butter (melted)
1 tablespoon caster sugar


  1. Put paper cases into muffin tin
  2. Grab your nearest heavy object and smash the Oreos into dust (or if you'd rather use a food processor - I'm a bash-it-with-a-rolling-pin type of girl),  pour melted butter on tablespoon of caster sugar into smashed-up chocolate biscuit and mix.  Press into base of paper cases and pop to one side.
  3. In another bowl mix together cream cheese and caster sugar until smooth.  Add vanilla essence and whisked eggs slowly - mix until combined, and then add sour cream.  Mix some more.
  4. Chop up chocolate bars into teeny tiny pieces (try not to eat them...).  I used a combination of mini Twix and mini Mars bars for extra variety (it also meant I had to buy two bags, guaranteeing spares!), and stir into the mix.
  5. Carefully put the cheesecake mix into the paper cases onto of the Oreo base - try not to over-fill as the cheesecakes will rise a little bit in the oven.
  6. Pop into a 200 degree oven for 30minutes, or until firm.
  7. Leave to cool and set in the fridge for 6 hours.
  8. Scoff.
It may look a little burnt (I had a slight oven malfunction) but my god it tasted divine.
And if you fancied being slightly healthier (who am I kidding?!) chopped-up strawberries work just as well!